Atnia Card Game Rules Document
- If you have not seen it, consider checking out the Atnia announcement video
- This information / rules document is a work in progress
- This Cubecobra page displays all of the cards (if they do not load, refresh).
- Join the Discord :)
- Dictionary for words on cards
- Small overview of set 1 themes: Atnia Set One (The New World) Overview
This is a 1v1 card game, within the gameplay genre of trading card games (not the distribution model). The rules will support constructed as well as draft, and an early version of the first set (The New World) will be available for drafting very soon! The game rules and cards are being designed to work both in paper and as a video game.
You begin the game at 20 life and win the game by reducing your opponent’s life total to 0. You will do this by attacking your opponent with your units, and using powerful spells and items.
The game takes place in Atnia, the setting of Ciaḃan’s Tabletop RPG. A short briefing on the world can be found here: Atnia Introduction.
Rules for playing the game:
Shared Round
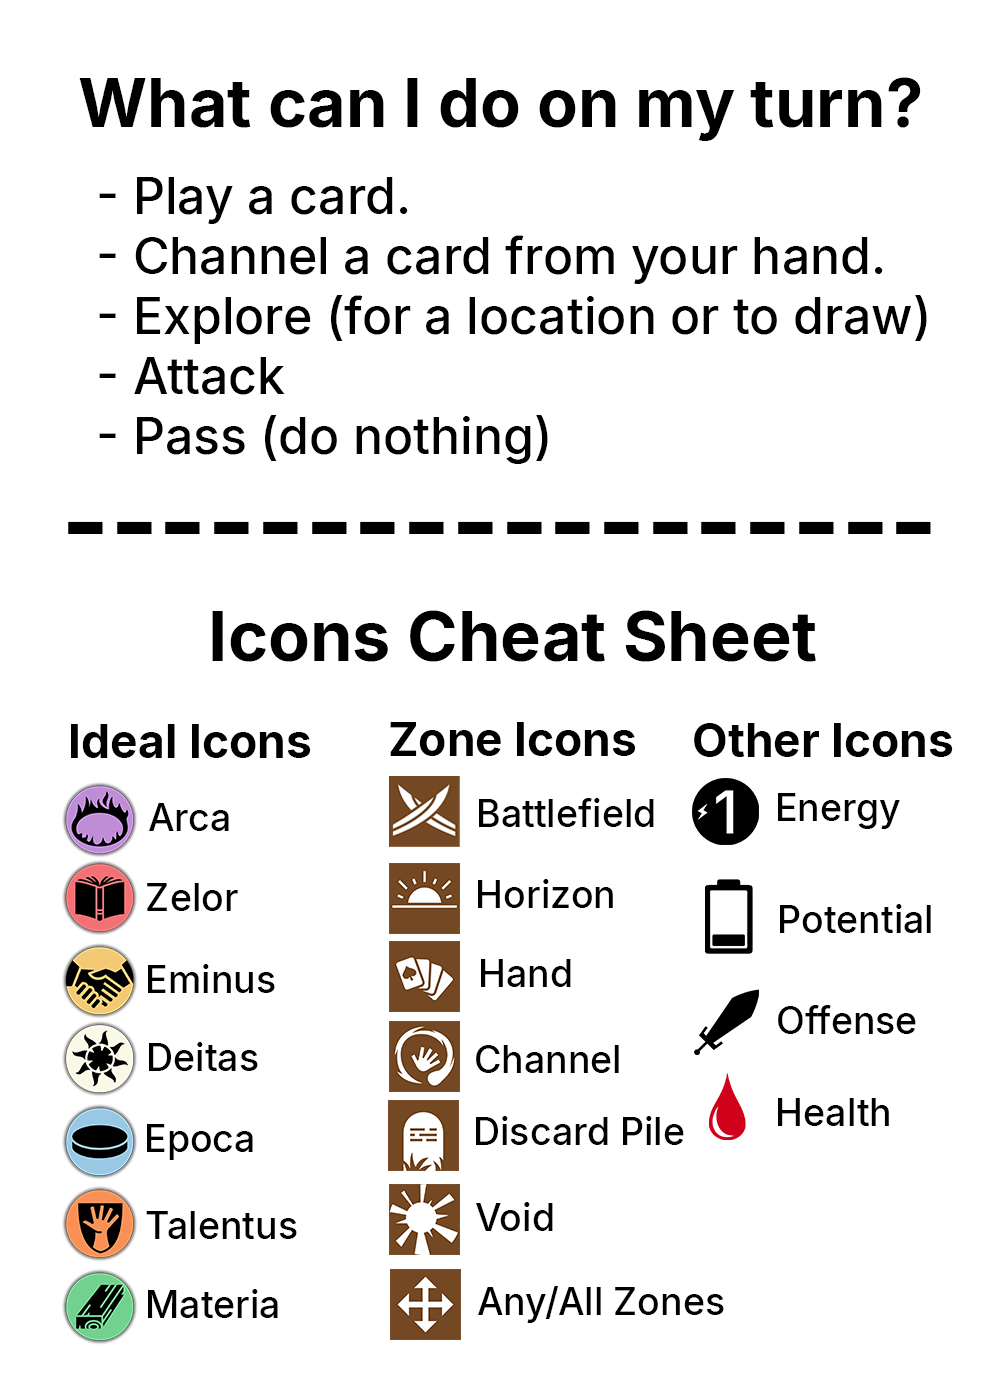
During each round players will take turns taking actions (mainly playing cards!). Only one player is the active player at a time, and only the active player can take actions. These actions include:
- Play a card or ability of a card - See “Playing Cards”
- Take universal actions such as passing or attacking.
- Pass - By passing, the other player becomes the active player.
After one player finishes playing a card or taking an action, the other player becomes the active player. This repeats until both players choose to do nothing, at which point the round ends and you move onto the next one.
Zones
There are multiple zones of play in which cards can be.
- Deck - Your deck of cards.
- Hand - Your hand.
- Battlefield - The main playing area / board. All unit and item cards that are currently in play live here.
- location zone - Similar to the battlefield, but dedicated to location cards.
- Horizon - Zone for cards & effects currently being played and not resolved yet.
- Discard Pile - When cards are destroyed or discarded, they go here.
- Void - Zone used for some things. Occasionally cards get put here.
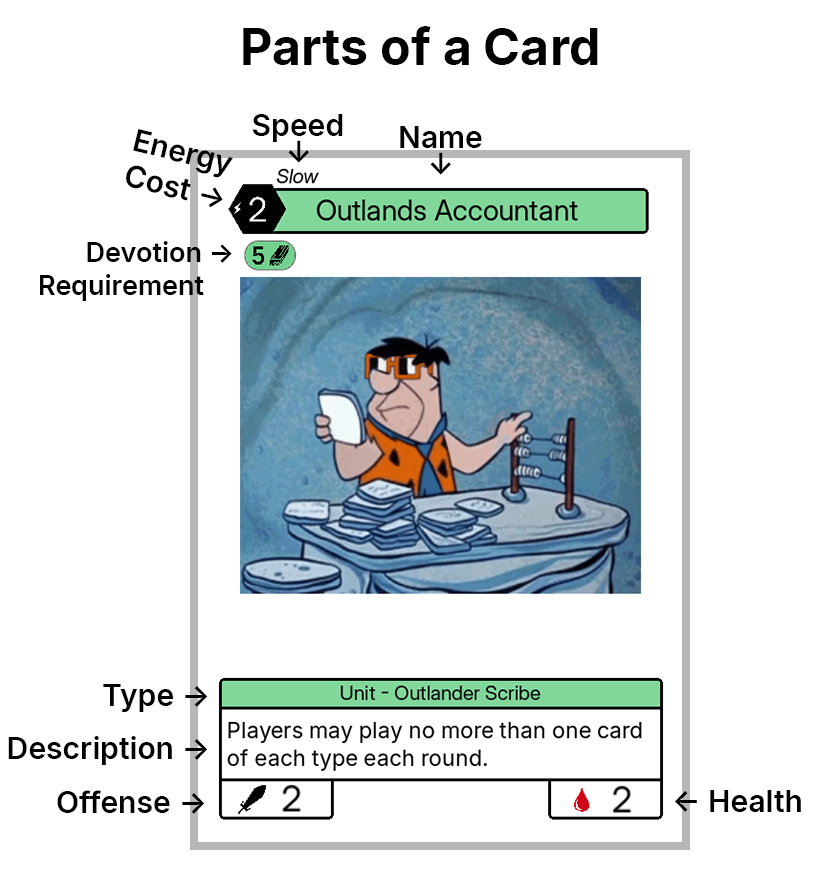
Parts of a Card
These are all of the things which appear on cards.
- Name
- Energy Cost - To play a card, you must pay energy equal to it’s energy cost.
- Devotion Requirement - See “ideals”
- Type - See “Card Types”
- Subtype - See “Card Types”
- Speed - See “Playing Cards”
- Offense/Health Stats
- When a card runs out of health, it is discarded. Damage only occurs to cards in the battlefield and horizon, and is permanent as long as the card remains in those zones.
- For details on offense, see the unit card type.
- Description / Rules Text - Explains what a card does. See “Playing Cards”
*Icons from https://game-icons.net/
Card Types
There are multiple types of cards in the game, and each of them operate differently.
- Unit - Units have offense stat in addition to their health stat, and can attack and block. Other card types do not have an offense stat.
- Item - Items (like units) stay on the battlefield, however, they do not have an offense stat and cannot attack or block.
- Spell - Spells do what is indicated by their description on resolution, then are discarded, unlike units and items which resolve to battlefield.
- Location - Play up to one location per round. Locations add devotion to each of their ideals based on their devotion stats. Locations don’t unflip at round start.
Cards may be flipped or unflipped, in paper indicated by rotating them 90 degrees.
Some cards will also have subtypes. Subtypes do not have any universal rules significance unless otherwise noted.
Resources
The resources for playing cards are split into two separate systems: Energy, and Devotion. Energy recharges each round, and is spent to play cards. Devotion requirements demand that you play location cards to reach a certain devotion threshold to be able to play your cards.
Energy System
There is a single (numerical) energy pool for each player. Players begin the game with 2 base energy and gain an additional one after each round (maximum is 10). Each round, players get energy equal to their base energy. After a round, if you have any unspent energy, bank 1 energy for the following round (so this can put you up to a true maximum of 11).
Devotion
Most non-location cards have a devotion requirement, which requires you to have a certain amount of devotion to an ideal (or multiple ideals) to play it. Once you have an amount of devotion, it is not spent when playing cards with devotion requirements. You gain devotion to ideals primarily by playing locations.
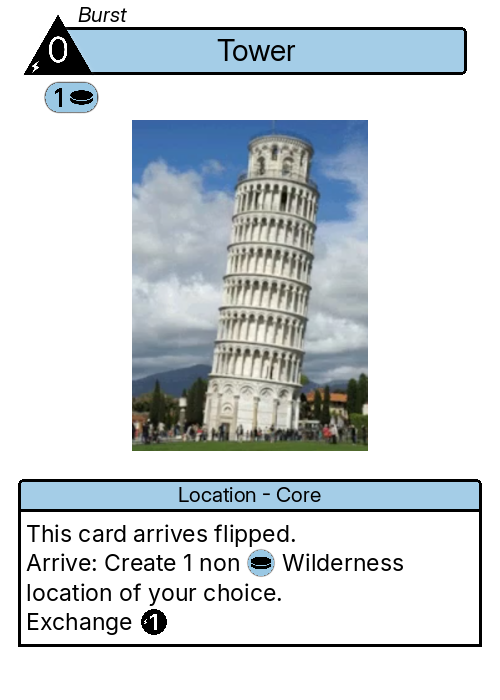
Locations
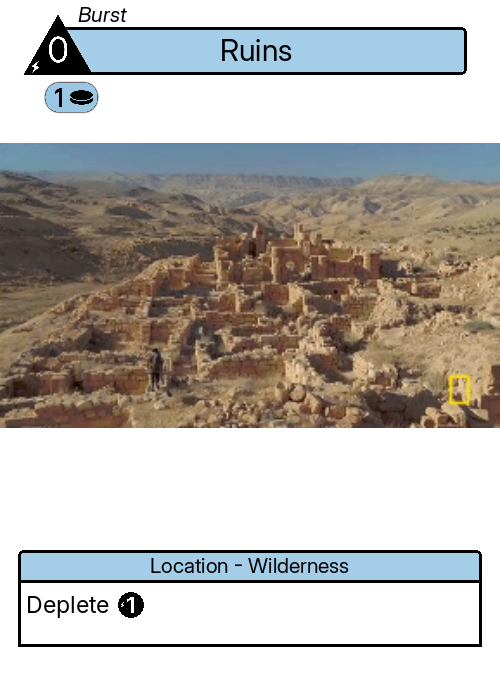
Play up to one location per round. When you play a location it goes to the location zone. Instead of having a devotion requirement to play, the ideal icons on location cards indicate how much devotion to that ideal the location provides while in the location zone. Locations don’t unflip at round start.
The most basic locations are the Core locations, which you can include any number of in your deck. Locations such as these generally have the ability called Deplete which allows you to flip them and pay energy to draw a card (which is one time use due to locations not unflipping each round). Some locations do not have this but may instead have another ability.
Exploration
Exploration allows you to trade a card in your hand for a location.
At burst speed, you may explore by putting a card from your hand on the bottom of your deck to create and play any Wilderness location of your choice. Wilderness locations are single ideal locations which add 1 devotion to their ideal. Note: you do not have to reveal the card you explored with and it does not matter what its ideals were, you can pick any of the seven Wilderness locations.
 |  | |
|---|---|---|
| From the Keyword Dictionary : |
- Exchange - At slow burst speed, pay the exchange cost, reveal the card from your hand, and put it on the bottom of your deck to draw 1.
- Deplete - At slow burst speed, pay the deplete cost and flip the location to draw 1.
Note: Even if you don’t need another location, you can use exploration to effectively replace a card in your hand with a draw from your deck via the Wilderness location’s Deplete ability.
The 7 Ideals
Ideals are the main categorization of cards in the Atnia card game and affect which cards you will be able to play together in the same deck. The ideals each represent a wide swath of related concepts the people of Atnia value (and you can use to rally them to your side in battle), as well as different paradigms or ways of doing magic.
The ideals are:
Arca
Chaos, The Rift, Arcane Magic, Change
- Symbol: A purple ring of magical energy.
- Arca represents a chaotic and wild energy that has expanded throughout Atnia after the apocalypse. Highly magical, both destructive and creative, to many it is symbolic of the new world.
- Warlocks, the Forsaken, dream mages, nightmares, people seeking power and change.
Eminus
Reputation, Law, Trust
- Symbol: A yellow hand shake.
- Your reputation among others or within a community. Laws and law magic. Trust built through a shared history or one’s reputation is important to those who value Eminus.
- Arbiters, law mages, politicians, traders, knights, the Old Watch.
Materia
Physical Resources, Alchemy, the Untamed Wilderness
- Symbol: A green plank of wood
- Resources people need and desire in the new world. While the other ideals are largely conceptual, Materia is grounded in the physical reality of the world. Food, lumber, salt, stuff that has value independent of concepts & social dynamics.
- Druids, the Salt Alliance, farmers, alchemists, vampires.
Epoca
History, Ancient Secrets, Past Civilizations
- Symbol: A blue coin.
- Drawing from ancient magics & past civilizations. While also very magical, it is in many ways the opposite of Arca, as it represents a romanticization of the past and opposition to the chaotic new world. Strongly connected to the coins/currency of the old Atnian kingdom.
- Nobles, traditional wizards, people who believe in the societies of the past.
Zelor
Passion, Emotion, Storytelling
- Symbol: A red book.
- One who values Zelor may join you if they truly believe in your cause or you give a rousing speech. Zelor magic draws from your own passions and emotions.
- Storytellers, bards, people who fight for a cause.
Talentus
Martial Arts, Armies, Skill & Craftsmanship
- Symbol: Orange shield with a fist.
- Talentus represents mundane skills as well as combat prowess. Low on magic / magic takes a more subtle form. Magic tends to be either magical weapons, or being supernaturally skilled at something.
- Tradesmen, soldiers, the Fifth Legion, martial artists.
Deitas
Gods, Religion, Relics
- Symbol: A white sun.
- Connection to and power of the gods. Since the apocalypse, Atnia’s connection to the gods has been severed, but those who still worship them draw power from relics left behind after the fall, still infused with the power of the gods.
- Clerics, priests, those who value religion or the gods.
There is no hard gate on which cards you can include in your deck. You may include cards from all 7 ideals if you want to, however you may then have a very hard time meeting the devotion requirements to play them.
Playing Cards & the Horizon
The horizon gives you a chance to see what your opponent is doing and react to it.
To play a card, you must meet its devotion requirement and pay it’s costs.
When you play a card or ability, it goes to the horizon zone, and the player who did not play the card becomes the active player, who may then take an action or pass. Any new cards/effects put into the horizon zone are placed above other cards/effects already there. Once any player passes, all cards in the horizon zone (unresolved cards) are resolved in order of top to bottom.
When a card is played, it goes to the horizon. When it resolves, it goes to battlefield if it is a unit or item, the discard pile if it is a spell, and the location zone if it is a location. When a card on the battlefield or horizon is destroyed (such as by having no more health left), it is put into the discard pile. Damage only occurs to cards in the battlefield and horizon, and is permanent as long as the card remains in those zones.
- To reiterate, you pay an ability or card’s cost to play it, and only once it resolves it does its effect / enters play.
- During the main phase, when all cards/abilities resolve, the player who did not control the bottom card on the horizon becomes the active player.
- All abilities are placed into the horizon just as cards are.
- Since new cards are placed onto the horizon above cards already there, when the horizon cards resolve, cards most recently added to the horizon zone will resolve before cards added to the horizon at an earlier point in time.
Speed
The speed of a card is indicated in the top left in italicized text. It determines when you can play your cards, and which cards you can react to your opponent playing. Below is the full list of different speeds and what they mean.
- Slow speed cards cannot be played during combat, and cannot be played while there are other cards/effects already in the horizon.
- Fast speed cards can be played during combat, and can be played while there are other cards/effects already in the horizon.
- Burst speed - If you play a burst speed card/action, it resolves immediately as you play it and you remain the active player and can continue playing cards. All burst speed cards and effects are always placed above and resolved before any fast or slow speed effects. No player can take actions while they are in the horizon, and they do not affect which player is or becomes the active player.
- If used alongside slow, ‘slow burst’ means you can play the card/ability whenever you could play a slow card, but it has the properties of burst. Otherwise burst cards can be played whenever you could play a fast card.
Playing Multiple Cards at Once
If you want to play more than one card at a time, you may commit multiple fast/slow speed cards to the horizon at once, although speed rules still apply, and you must choose an order for the cards to be placed into the horizon.
- When doing this, if there are no cards already in the horizon, you are able to play a slow speed card as the bottom card, and commit fast speed cards along with it on top of it (the slow speed card must always be on the bottom though, as slow speed cards cannot be played when there are other cards on the horizon).
- When committing multiple cards at once, cards committed lower on the horizon are legal targets for cards committed higher on the horizon (but not vice-versa).
- If you would like to guarantee putting multiple cards onto the horizon, commit them all at once, because once you commit your cards, if your opponent chooses not to react, all cards on the horizon will resolve.
- Since burst speed effects resolve immediately as you play them, you cannot commit them alongside other cards as they will resolve instantly. Imagine it as dragging a card from your hand onto the board in a video game and as soon as you let go of the mouse it resolves.
Timing of Triggered Abilities
Some cards will have abilities such as ‘whenever X do Y’. These operate at burst speed.
Round Phases
The round is broken up into a number of sequential phases.
- Pre round
- If it is not the first round of the game, the player who did not end the previous round becomes the first/starting player (the player who passed first in the double pass will go first in the following round). TLDR if you were the last person to attack or play a card or something, you’re going second.
- Worded differently, if you took the last action before the round ended, you will go second in the following round.
- Each player’s base energy increases by one.
- Each player gets energy equal to their base energy.
- Each player unflips all cards on their battlefield.
- Move to next phase
- If it is not the first round of the game, the player who did not end the previous round becomes the first/starting player (the player who passed first in the double pass will go first in the following round). TLDR if you were the last person to attack or play a card or something, you’re going second.
- Round Start
- If an effect refers to round start, it happens here.
- Once all effects are resolved / there are no unresolved effects, move to the next phase.
- Main phase
- The first player becomes the active player (unless otherwise specified).
- When both players pass with no actions taken in between the passes, move to the next phase.
- This is the primary phase where players actually play the game, along with combat which players can enter from the main phase.
- Round End
- If an effect refers to round end, it happens here.
- Once all effects are resolved / there are no unresolved effects, move to the next phase.
- Draw Phase
- Each player simultaneously chooses whether they would like to put the cards in their hand on the bottom of their deck (in a random order).
- Each player draws cards equal to 1+ the number of cards they just put on the bottom of their deck.
- Begin next round
- Combat phase
- See “Combat”
If a phase/step does not explicitly make a player the active player, no player is active and therefore players may not take actions (such as playing cards), however, If a fast or slow speed card/effect is somehow put onto the horizon anyway, the player who does not control it becomes the active player.
Notes on ending the round:
Draw phase notes:
To do the simultaneous decision making, you can give each player two cards (one for keeping their hand one for not), each player picks a card and places it face down, then players turn over their cards at the same time.
Combat
Combat is how you can use your units to damage your opponent, or use your units to block opposing units attacking you. You can attack whenever you could play a slow card.
During the main phase, while you are the active player and there are no unresolved effects, you may start an attack by declaring your attackers. You attack players, not their cards (you can only attack opposing units directly if the attacking unit has ‘challenger’).
- You may attack up to three times per round, with any number of units each time.
- Both attacking and blocking causes units to flip.
- You cannot attack or block with flipped units.
Combat phase outline:
- Combat begins with the attacking player being active, declaring one or more attackers and committing any desired cards/effects to the horizon.
- After attackers are declared, any triggers/effects created by this are put onto the horizon, however only ∞ and burst speed effects are resolved. Fast and slow cards/effects will resolve during step 3.
- Defending player becomes active, declares up to one unit to block each attacking unit, and commits any desired cards/effects to the horizon.
- After defenders are declared, any triggers/effects created by this are put onto the horizon, however only ∞ and burst speed effects are resolved at this step. Fast and slow cards/effects will resolve during step 3.
- The attacking player becomes active, and players may play cards/pass as normal. After a player passes, all cards and effects on the horizon are resolved, then all combating units simultaneously strike (deal damage equal to their offense stat) the unit blocking/being blocked by them, and if they are attacking unblocked, strike the defending player.
- Combat ends. Return to the main phase, and the player who was attacking becomes the active player (attacking works the same as the ‘intermezzo’ card ability)
TLDR for combat timing windows: if you are attacking you have two windows where you are guaranteed to be able to play cards. These are while you declare your attackers, and after blockers are declared. The defending player has one guaranteed window, which is while they declare their blockers.
Notes:
- Blocking is done in step 2, and cannot be done later. You can only block with a unit put into play after blockers are declared if that unit has ‘guardian’
Starting the game
To start the game, randomly determine the first player. Each player shuffles their deck, draws 6 cards, and starts with 20 life. Each player may choose to put the cards in their hand on the bottom of their deck in a random order to draw a new hand of 6 cards. Once each player has kept or replaced their hand, begin the first round of the game. Players will have 2 energy on round 1.
Card Semantics
See the Naming V2 sheet in the Atnia Cards Sheet for info on words that appear on cards.
Here is some additional info:
- The brown symbols in the description box of cards are zone symbols. A zone icon may indicate which zones a card or effect can target, or which cards in what zones are relevant to it.
- Each the zone icons simply refer to one of the zones in the Zones section of this rulebook, and a cheat sheet for all icons including the zone icons can be found above.
- If multiple zone icons are listed in a row, read it as ‘this zone or that zone’
Extra Notes
- Damage dealt to cards in horizon/battlefield is permanent (until they leave).
- In paper, please track unit health by leaving undamaged units without any dice, and using dice to track the total remaining health once a unit’s remaining health is no longer equal to the number on the corner of the card.
- Health is persistent as a card moves from the horizon to the battlefield.
- If a card is given a health buff, then takes damage, then the buff goes away, the full extent of the health buff is taken away still. Whenever a health buff goes away, the unit effectively takes that much damage. There should not be many/any temporary health buffs for ease of tracking.
- Targets for cards are chosen as you play the card (as it enters horizon), not on resolution. Same for abilities. The arrive ability is quite common and has specific rules surrounding it, that targets are chosen as you play the card to the horizon if possible (rather than after it actually arrives on the battlefield).
- If a card would resolve and targets originally chosen for it no longer exist (if they are made to be illegal targets they cease to exist as targets), any effects related to that target don’t happen. Any other effects on the card still occur. Eg no ‘fizzling’.
- If a card says ‘do x to do y’, if x does not happen, y won’t happen. Y includes all remaining text on the card until the next line break (line breaks are currently a bit hard to see sometimes, unfortunately, as the line spacing is the same as text wrapping. It should be fairly obvious in practice what the card means for this though as the next text block will be entirely unrelated to the current one).
- Unless an ability says ‘you may’, you must do it.
- Locations do not have a health or offense stat. They cannot be dealt damage, granted/given health or offense, etc.
- If a card has no health stat, it can be targeted if it is otherwise a legal target, but dealing damage to it won’t do anything.
- Cards with a null health stat do not count as having 0 health for the purposes of for example checking if they have 2 health or less (the answer would be no, it doesn’t have 2 or less health).
- Items and spells do not have an offense stat. The same rules about null stats apply here as well.
Advanced notes on timing rules and the horizon:
- If during horizon effect resolution one or more new cards/abilities are put into horizon that are not at ∞ speed, resolution stops, and the player not in control of the new top most card/effect becomes the active player.
- If multiple effects that require targets to be chosen are put into the horizon simultaneously, targets must be chosen for the bottom most effect(s) first.
Note: The following rules are experimental and intended to allow for automatic ordering and resolution of triggered abilities in a future video game version. You may ignore these for now if you like, or choose to become a test subject and let me know how it goes xd.
- If effects would trigger simultaneously, they are put into horizon all at once, in order of, from top to bottom:
- Effects from the first player in the round above effects from other players.
- Top to bottom, triggers from cards in: horizon, battlefield, the discard pile.
- Horizon, top to bottom: Cards higher in horizon to cards lower in the horizon.
- Battlefield, top to bottom: Cards on the left side of a players battlefield zone to cards on the right side of their battlefield zone (combatting cards are assumed to be to the left of non combatting cards).
- Discard Pile - If a player has multiple simultaneous triggers from cards in their discard pile, smaller cards go on top and and larger cards go on the bottom (determined by offense, tie broken by health, tie broken by base energy cost. After base energy cost is a tie, in paper players decide the order, and online it goes by alphabetical order of card name (earlier in the alphabet goes on top))
- If a single card has multiple triggers occur at once, the one(s) on top of the card’s text box go above ones lower in the text box.
- All new cards arrive on the battlefield to the right of cards already in battlefield. Attacking allows the attacking player to choose the order of their attacking units. Blocking forces the blocking units to match the location/order of the attacking units. At end of combat all attacking/blocking units return to the rest of the battlefield zone on the left of cards already there that didn’t attack/block, in the same order/arrangement they were in combat.
- Items always stay to the right of units, and locations to the right of items. You can organize these into rows on your battlefield with locations closest to you.
- If multiple cards would enter a player’s battlefield at once, they enter with the largest card on the left and smallest card on the right (see keyword dictionary for meaning of largest/smallest).
- If multiple cards are in one board space (such as with weapons), the card on the bottom (the weapon) is assumed to be to the right of the card on top.
Drafting (for cube drafters)
You can draft this game similar to a normal cube draft, however, due to there being 7 ideals, you will want to see more cards during the draft to avoid being stuck with too many unplayable picks. For 8 players, we currently recommend 4 packs of 15 cards, burning the final 4 cards of each pack (aka skip the last 4 picks of each pack). After drafting, create a 40 card deck from your pool.
The Core locations are provided as basics, and after drafting you may add as many of them as you wish to your deck.
Strategy
The best strategy for what locations to play is not entirely set in stone, but for a recommended starting point:
- For single ideal decks, you will want to play zero core locations and explore for all of your locations, and/or play locations you drafted.
- For decks with two ideals, you can use 20-25% of your deck being core locations as a starting point. However, an optimal density has not been determined and your devotion requirements impact how many you want to play. You may want to play a few more locations in decks with 3+ ideals.
Most draft decks have two or three different ideals. It is very difficult to only draft cards of a single ideal, and going 4+ comes at a heavy cost to efficiency/consistency.
Draft Logistics
- The number of cards in set 1 is slightly greater than
15*4*8, so you may have a few cards left over after creating packs. - Players should be provided with the keyword dictionary before/during drafting so they know what the cards do, and/or just have some people who know what the keywords are so people can ask and answer verbally.
- In addition to the Core locations, also provided in the print sheet are the Wilderness locations, token cards created by other cards, and cheat sheet / helper cards which should be handed out to each player. Store these each separately.
- After drafting, players will want to take Core locations to add to their deck, the tokens they need for their deck, a single copy of the cheat sheet cards, and about 3 of each Wilderness locations in their ideals.
Other Draft Methods
You can use an alternative drafting setup from the recommended one above if you would like to play with a number of players, where these packs don’t work well for some reason. If you do this, keep in mind that players will need to see more cards to produce decks that are equal in functionality to a traditional cube draft, as there are 7 ideals. In particular, later picks are far more likely to contain useless cards not in any of your ideals, which is why the recommended draft format has you discarding the last 4 cards of each pack.